Friday, January 25, 2013

Coloring class - 2

Hallo,
  Well I am fixin to head off to class so I thought I would get this posted.
  The first picture is the demo board for my class today. I used stamps from Impression Obsession - www.iostamps.com and Flourishes - www.flourishes.org

  The first stamp is the scene from IO and it is really alot easier to color than it looks - alot of the shading is already on the image. The first picture shows my first layer of the lightest colors. You can see how the stamp show shadows under the watering can and the shadow of the cans spout but if you look closer it has the shadows along the fence grid and the left side of the watering can too.
  The third photo shows how I added the next darker colors - darker gray to the can and fence, a bit of brown to the center of the flowers and petals and a darker shade of green to the leaves.
  In the fourth picture I added a rusty brown color to the can and a darker brown to the flower center/petals and the darkest green to the leaves.
  For the magnolia stamp I started with a layer of white over the flowers then 2 light yellows - using the lightest on the flower and a slightly brighter one for the leaves - now magnolias are often a creamy white or ivory colored is why I used pale yellows (you could also use tans or light brown)
  On the second layer of the magnolia I did use a light brown to shade some of the curves of the flower petals and a darker green for the leaves and blended back with the lighter colors.
  I colored the backround with blue and added a bit of dark green and blue as the darkest layers on the leaves - blending back with the lighter colors.
  All for today - looking forward to my weekend off!!!
    Take Care
        Tera


Thursday, January 24, 2013

Hello Pumpkin

 Hallo,
  A quick note before I head off to work tonight - I finished off this card today using one of the images from my class that I taught last week.
  This stamp is from My Favorite Things - Pure Innocence and is colored with koh-i-noor pencils.
  The black frame is a label from a package of paper from the Paper Temptress - it fit perfectly onto this 5 by 5 card.
   All for today - Take Care
       Tera


Wednesday, January 23, 2013

Sweet treats

 Hallo,
  I am a bit sleepy this afternoon so if my post gets a but wonky then you will know why.
  I colored the main panel up while stiing on the couch last pm and finished it off today.
  The stamp is from Impression Obsession - candy jards G2332.
  I did this for the current challenge over at the IO blog which is for something sweet :) Check it out here - www.mitrafriant.typepad.com
  I colored it with copics and layered it to some pretty pink DP's and onto darker teal cardstock (I also used the same dark teal for the hearts.)  I used some tissue paper flowers and some heart stickers to finish it off.
   All for today - might be nap-time.....
          Take Care
             Tera


Tuesday, January 22, 2013

Tasty tomatoe

 Hallo,
   A quick card for you today - I used one of the images from my coloring class last friday.
   The stamp is from Flourishes and is colored with koh-i-noor pencils.
   I layered the main image onto a label from Paper Temptress. I accented with liquid pearls - aka tulip fabric paint.
   I used a Spellbinders die and an out-of-the-box technique.
   Okkay dokkay - time to take my puppy for a walk and I have 2 classes this am which should be fun - Zumba and a locker rug weaving class....
   Take Care
        Tera


Friday, January 18, 2013

Coloring class

Hallo,
  Welcome to friday - or in my case more like Sunday because I work tomorrow and Sunday nights....
  I just thought I would show you a bit of what I have been up to lately (in addition to trying to finish off my Christmas bulb project that is...)
  Starting this afternoon I am teaching a class at the local 'Center for Lifelong Learning' It is an all volunteer organization that offers a wide variety of classes twice a year for 8 weeks.
  My class is tittled - Coloring for cardmakers. I am by no means an expert - I just love to color and have picked up a few things along the way - art in High School (a couple years ago), a couple college classes, books, the internet, a few gallery classes and ALOT of time playing :)
  The first 4 classes with be with blendable color pencils - in this case Koh-i-noor and the last 4 will be watercolor - also Koh-i-noor.
  In this first class I plan to talk a bit about light and shadows and blending of colors, some tips for starting with the pencils and will demo 2 images. The type of pencils I love are the soft lead, oil based, blendable pencils (Koh-i-noor. prismacolor, lyra to name a few) Both Koh-i-noor and prismacolor can be found at AC Moore and you can use your coupons on them :) You can also find prismacolor pencils at Mike's, JoAnn's and Hobby Lobby (as well as a ton of places on the internet)
  The first picture is a stepped out demo board using both of todays images - I will have one for each of my students to take with them.
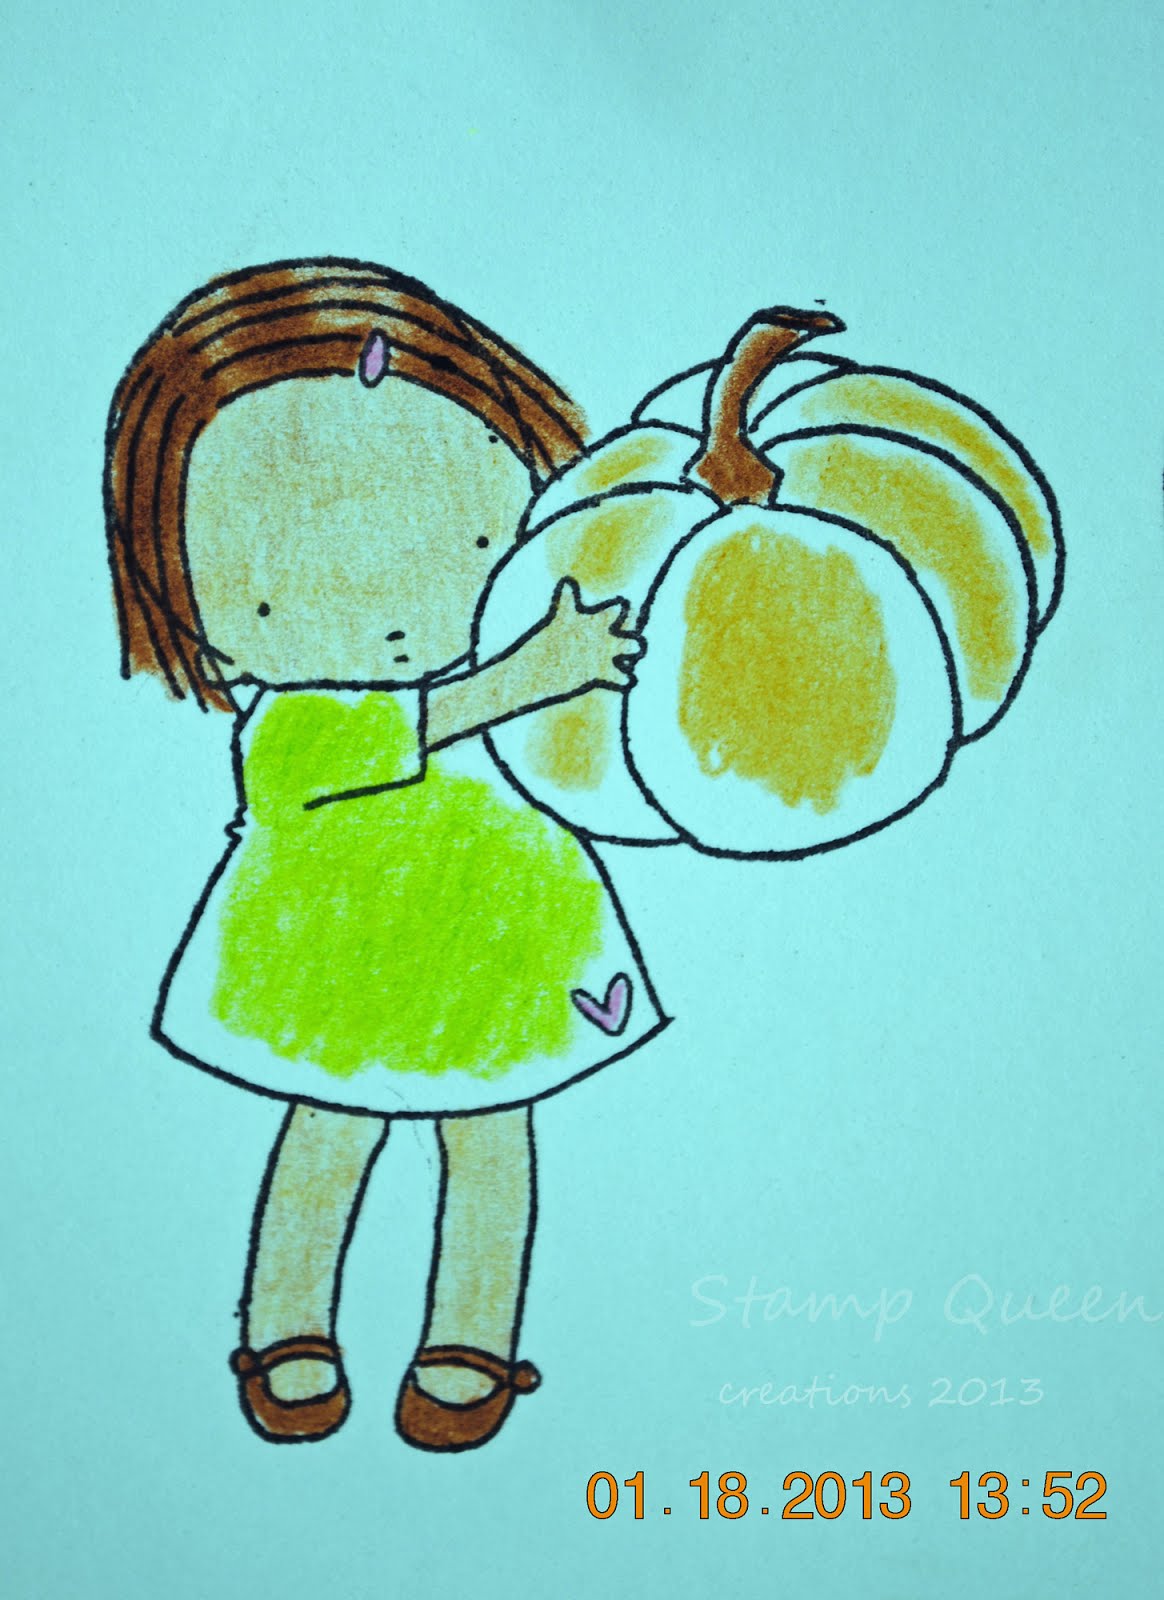
  The second photo just shows light and shadows. The image is a sweet little one from My Favorite Things  - www.mftstamps.com.
  Light and shadows seem to bother people the most but its not that hard with a bit of practice - shadows lie opposite the light and under things (like under her arms and on the bottom of the pumkin). My yellow X represents the light source and the gray the shadows (and shadows are not always gray mind you :) This gives us a starting point to lay down the lightest colors.
  These pencils can be used by laying down light to dark or dark to light - I find it easier to work light to dark as I can always add more dark but its harder to take away a darker color. Typically coloring in a circular motion will give you the nice smooth coverage but whatever works for you :)
  The next picture I layed down the lighter colors - yellow, light green and brown (leaving lighter spots where the 'sun' hits) and peach tone for her skin.
  In the next picture I added in the medium tones of green, orange and a light brown (in skin areas) and then went back with the lighter colors and blended the division lines. As you use the lighter pencil over a darker it blends and smooths the division lines - adding a bit of darker to the light area and making the darker area a bit lighter.
  With the last little girl photo I added the darker colors and again blended with the lighter colors - going back and forth till I liked how it looked  and then added some pink for her cheeks. Lastly I added some shadows  - shadows help make the image stand out a bit off the paper visually and give the picture some depth. I usually have my shadows a bit lighter and smoothed into the background more but I left it as is so it would be easier to see for now.
  The tomatoe image is from a local (Pensacola) company by the name of Flourishes (I think you have heard that name here once or twice as they are only one of my all time favorites!!!) www.flourishes.org
  Both of these stamp companies have blogs and gallerys that have a ton of ideas and eye candy to look at BTW!!!
  I pretty much use the same light to dark coloring techniques for the tomatoe. This stamp has some pretty good referance lines for the shadows in the curves of the leaves and the curve of the tomatoes which makes it easier to decide where to put your shadows.
  All for today - I do plan to post my class project each friday from now on for the 8 weeks if you want to follow along :)
  If you have any questions or requests just let me know!!!'
   Take Care
         Tera
  P.S. I had a couple question come up in class so will add some info here too...
Paper and ink
Paper - my favorite papers for stamping and coloring are #1 Cryogen White and #2 Neenah (white, natural white and desert storm) but regular white cardstock that you can buy in bulk at Sam's, wal-mart or Office Depot works too. The 2 brands I use are smoother and blend a bit better than the regular stuff and they are a bit heavier weight - I have found thaty I can test out colors on the back of my panel and it won't show through the front - even when I use Oderless Mineral spirits(OMS) or copic markers. There are other papers out there that are good for pencils and copics such as X-press blending cardstock and Heavenly White and probably some I don't know.....
Ink - for pencils (without OMS) almost any ink will do as long as it has had time to dry - staz-on, distress and water based inks like those from Stampin' up. Once you start to use OMS some of these inks will bleed, how much will often depend on which paper you are using. Water based inks will often bleed with the OMS and with copic markers and definatly bleed if you paint with watercolors.
      I use memento inks almost exclusively for all my coloring. I have several boxes of stamped images in my 'coloring' bag that sits by my spot on the couch and I pull them out and color in the evening while the family is watching TV - which means I might feel like pencils, pencils followed by OMS, or copics - even watercolors sometimes (though I usually take the image to my craft room if I want to watercolor) So therefore the memento works best for me because it will tolerated OMS as well as the copics  and watercolors without bleeding.
    Ok all for now.....


Thursday, January 17, 2013

Cherry Blossums

Hallo,
  Just a quick card for you this am - was doing some prractice for the coloring class I am teaching starting this week. I hadn't used OMS for a looonng time and I want to show them how to use it in one of my classes.
  The flowers to the left of the stem were colored by dipping the tip of the pencil (koh-i-noor) into the OMS and coloring with it. The flowers to the right were colored normally and blended later.
   I used the colors from the current Tuesday challenge over at Flourishes - and the stamp is from Flourishes - check out the challenge here - www.flourishes.org/blog/
The colors for the challenge were shades of pink, teal and brown.
  I used a texture folder on the main image and sponged it with tea dye and memento brown inks. Used some pretty Dp and then added some pink pearl drops with a tulip fabric paint pen.
   All for this am - Take Care
        Tera

Thursday, January 10, 2013

Wedding Charms

Hallo,
  Well its going to be a long day - just got off work and am planning on staying up at least until this afternoon....first I am going to run and get my new glasses, then I have an instructor orientation for a class I am teaching evevry friday for the next couple months - Coloring for cardmakers - with the local volunteer organization Center for Lifelong Learning. Next I am going up to the HS to order my kiddos ROTC photos.....then I will get a bit of sleep(course by that time I might just sleep on through the night....)
   I have been doing a few of these wedding charms/Christmas ornaments - once I did the first one I wanted to try a few others.
  The stamp is from Flourishes and I embossed it onto the glass ornament with silver, gold and vintage photo distress powder.
   I used a piece of lace that used to be a curtain (found at a thrift store for only a buck for 2 of them). I glued the lace to the back with chrystal laquer because it dries nice and clear.
  I edged the edges with gold or silver mettalic pen and finished the hanger off with a bow and a ribbon. In the case of the gold and vintage photo ones I used the trim from the bottom of the curtain for the bows and with the silver one a beaded trim from my stash.
    I have a few more ornaments in the works - not sure if they will be wedding ones or what but I took pieces of the lace and died them with glimmer mist before I glued them to the ornament.
  Not sure how much crafting time I will have this weekend - tomorrow I am getting a tooth pulled so we will see how much of a wimp I am with that - At worst I hope for some comfy couch time reading a good book!!!
  All for now - good keep moving if I am going to stay awake this am and puppy is ready for her walk(well she was ready when I walked in the door... :)
   Take Care
         Tera


Wednesday, January 9, 2013

Gratitude

Hallo,
  Well this card didn't turn out like I had envisioned but I am out of crafting time for the day and need to get my pre-work nap .....its been one of those days, I was a bit late gettting puppy out the door for her walk and a quick trip to the vet for her heartworm test so late getting in for a shower....the phone rang twice during my shower, one I answered and one I called back, then when I met the DH on base (not the closer one but the one across town) to get my ID renewed the place was closed....came home to get some pictures of some ornaments I had done and dropped one and broke it.....ah well....
   Anyway - I did this card for the current Tuesday challenge over at Flourishes - www.flourishes.org/blog/ which is for something 'new'
  I used one of my newest stamp sets from Flourishes. I stamped it onto neenah desert storm and lightly colored it with copics. I had planed on the light coloring to make the phrase show up when I stamped over the top of the image. I used memento brown thinking it would be dark enough but it wasn't - hardly showed at all. So to fix that I pulled out a piece of vellum and stamped/embossed with black to lay over the top. I thought the image would show behind it a bit better....so the piece of vellum covers up the image more than I would like...but you can see the image a little better IRL than in the photos so I guess its ok (although I may have to do up another and use black ink on the phrase this time.
  I used an embossing folder to frame the image and sponged it with walnut stain ink. Some lace, a ribbon, some DP and some bronze viva decor pen drops finish it off.
   Check out all the fun at Flourishes this week - release week challenges and prizes too!!!
   Take Care
        Tera


Tuesday, January 8, 2013

Forever Love

Hallo,
  Well I was a bad girl today - I had already spent my craft budget for the month but JoAnn's have a 25% off everything coupon - even sale items and that doesn't happen often. Usually when I go to look with one of these coupons there isn't much on sale so I don't buy anything (I buy what I need with the 40 or 50% off coupons instead....) WELL - they had all Tim Holtz products on sale for 40% already and the 25 % off on top was too good to resist - 65% off!!!! Gears and watch parts and corners, oh my, chipboard books and fancy buttons too, and more gears, and a pocket watch shell or 2......you get the idea.....
  I have for you today an Valentines doo dad - charm, ornament, package decoration.....it is made from an oval glass piece that I got very cheep after Christmas at A.C. Moore.
  First I glued a piece of old lace (from a curtain I found at a thrift store - very cheep :) with chrystal laquer (because it dries clear)
   Then on the front I stamped and embossed the heart and phrase, both of which are from Flourishes.
  I edged it with gold mettalic pen and added some red and gold ribbon as a hanger.
  I will be using this for the first release week challenge over at Flourishes - http://flourishes.org/2013/01/are-you-ready-for-some-release-week-fun/
   All for today - need to finish off a couple things in my craft room and maybe clean house a bit - oh yes I also have an appointment with a good book - the last and final book of Robert Jordan's 'Wheel of time' series came in the mail today - #14 and I cannot wait to dig in, I have been reading this series for about 20 years now - no joke, each new book would come out about 2 years apart.....
  Take Care
         Tera


Monday, January 7, 2013

Pretty Peony

Hallo,
  Ahhhh - 2 days off!!!!
Showing you a little tidbit from Impression Obsession before I head off to bed for my morning sleep.
This stamp is 'Pretty Peony'  #F8739 and it is colored with copic markers.
  I did this up for the current challenge over at IO which is for 'anything goes'!!!
  I found some pretty purple paper to match and used purple ink (yes it is purple - just couldnot get it to photo true...) to spruce up some white paper flowers. A piece of lace from the trim portion of some old lace curtains that I found at a thrift store, and lastly a bit of pearl trim that I found at Mike's on sale.
  Check out the challenge over at IO, along with some release week fun too - www.mitrafriant.typepad.com
  Have a great day!!!
         Tera


Sunday, January 6, 2013

Wedding ornament or charm

Hallo,
  Just a bit of blog time to unwind from a very busy night at work - anyone know where I can get a pair of turbo charged rollar skates? :) yup just a teeny bit busy....
   Well this is another of my projects from saturday with a wedding theme - I was thinking for a couples first Christmas but it would be cute as a wedding decoration or charm too.
  I used the flat glass ornament again - this time I started out by taking a piece of lace and glueing it to the back with chrystal laquer. The lace is from an old curtain that I found at a thrift shop for only a buck :).
  On the front I used a stamp from Flourishes and embossed it in black. I edged the ornament with a gold mettalic pen and used a gold ribbon for the hanger.
  It was hard to get a good picture of this one but it turned out so prretty and looks great with some light behind it!!!
  The thrid picture is of the back so you can see the lace better.
  I am entering this in the current tuesday challenge over at Flourishes - which is to pick a tuesday challenge from last year and do it again so I used FTTC #200 which is of course to make an ornamnet or something 3D. Check out the challenge here - www.flourishes.org/blog/
  Its release week at Flourishes to be on the look-out for more challenges and great prizes as well as great new stamps!!!!
  Ok - off to bed with me, one more night to go!!!


Saturday, January 5, 2013

Silver Nativity and heartbroken

Hallo,
  A short post for you today - trying to get back in the habit after the holidays....

    I did this ornamnet for the current tuesday challenge over at Flourishes - we were to pick one of last years challenges and do it again. I chose to make another ornament - I had planned to have a bunch of these done BEFORE Christmas but ran out of time. It was FTTC #200. Check out the challenge here -  www.flourishes.org/blog/

  I found these flat glass ornamnets at A.C. Moore and stamped/embossed this beautiful nativity image from Flourishes onto it. I edged the edges with a silver mettalic pen. It will look so cool with the Christmas tree lights behind it!!!

   The last picture was another of the glass ornaments dected out Valentines style and was going to be my entry for this months first release challenge over at Flourishes - that is until I dropped it - hence the 'broken' part.....
I guess I will try again on Monday - I work tonight and tomorrow night......
   Have a great weekend!!!
         Tera