Tuesday, November 27, 2012

Cross and crown

Hallo,
  A quick note this afternoon and off to work again - fixin to be a busy evening.....
  I finished off this project over the weekend. It was the first time for me to alter a bottle of crown :) (empty of course). One of my coworkers has a son that just recently became a minister and after the ceremony the had a ton of family and friends over to celebrate - hence the bottle of crown. She thought it would make a good souvenir so asked me to decorate it.
  I used brown cardstock  - with a white core - for the topper and ran it through a leaf texture folder, sanded and then swiped over the danded parts with green ink.
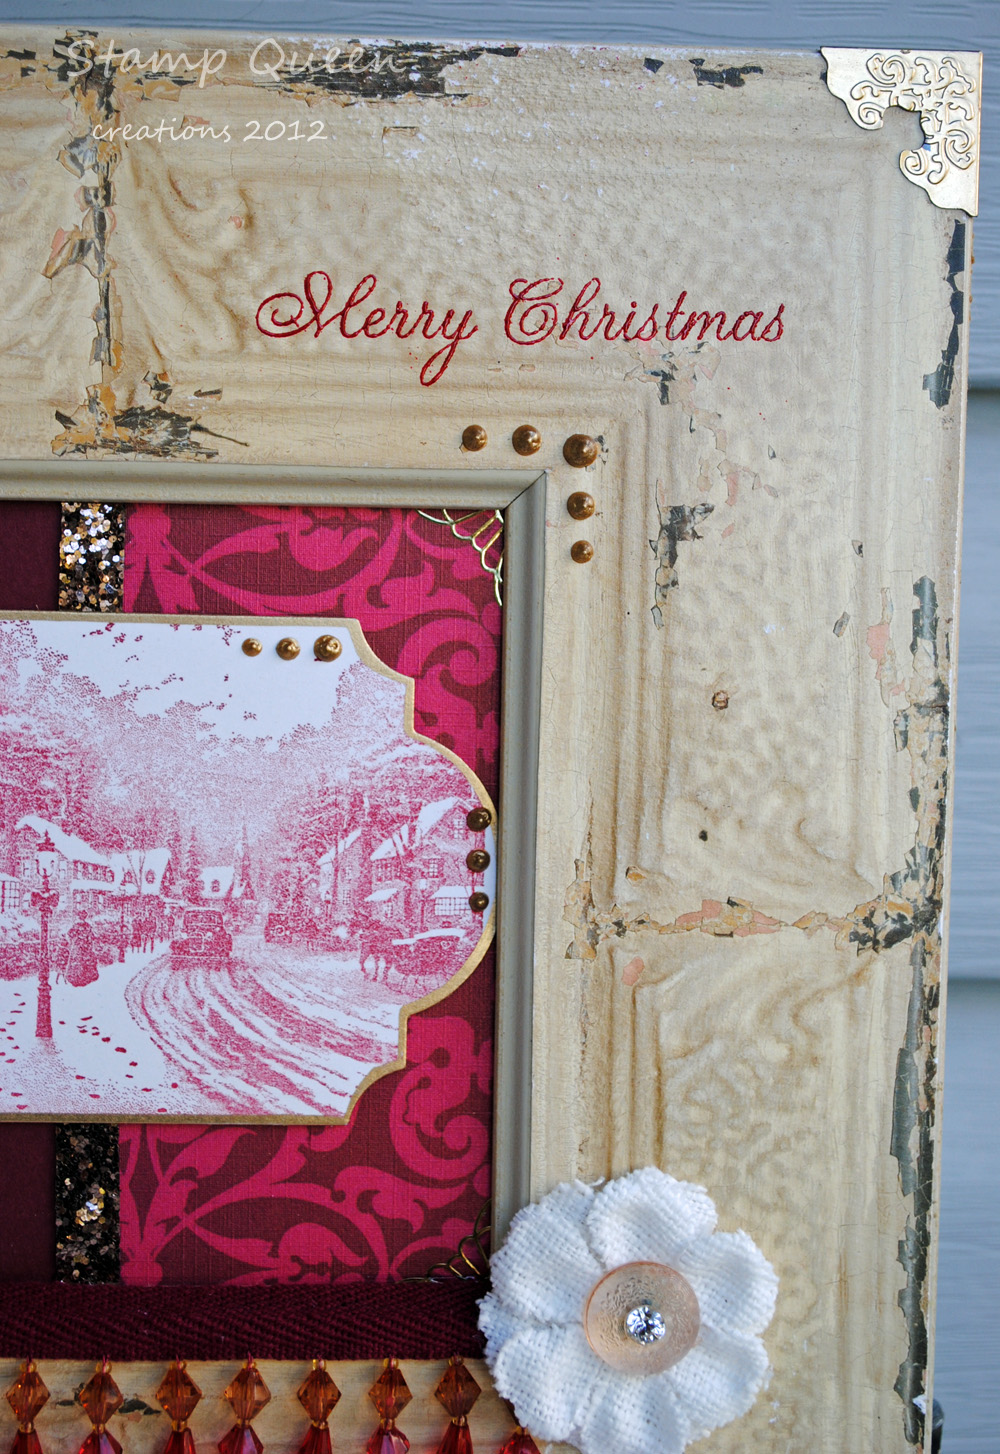
  Both panels were done with stamps from 'Our Daily Bread' designs.
  I used prismacolor pencils to color the background on the first panel and then stamped/embossed the cross over the top with distress powder. I cut both panels with a Spellbinders die and edged with a gold metallic pen.
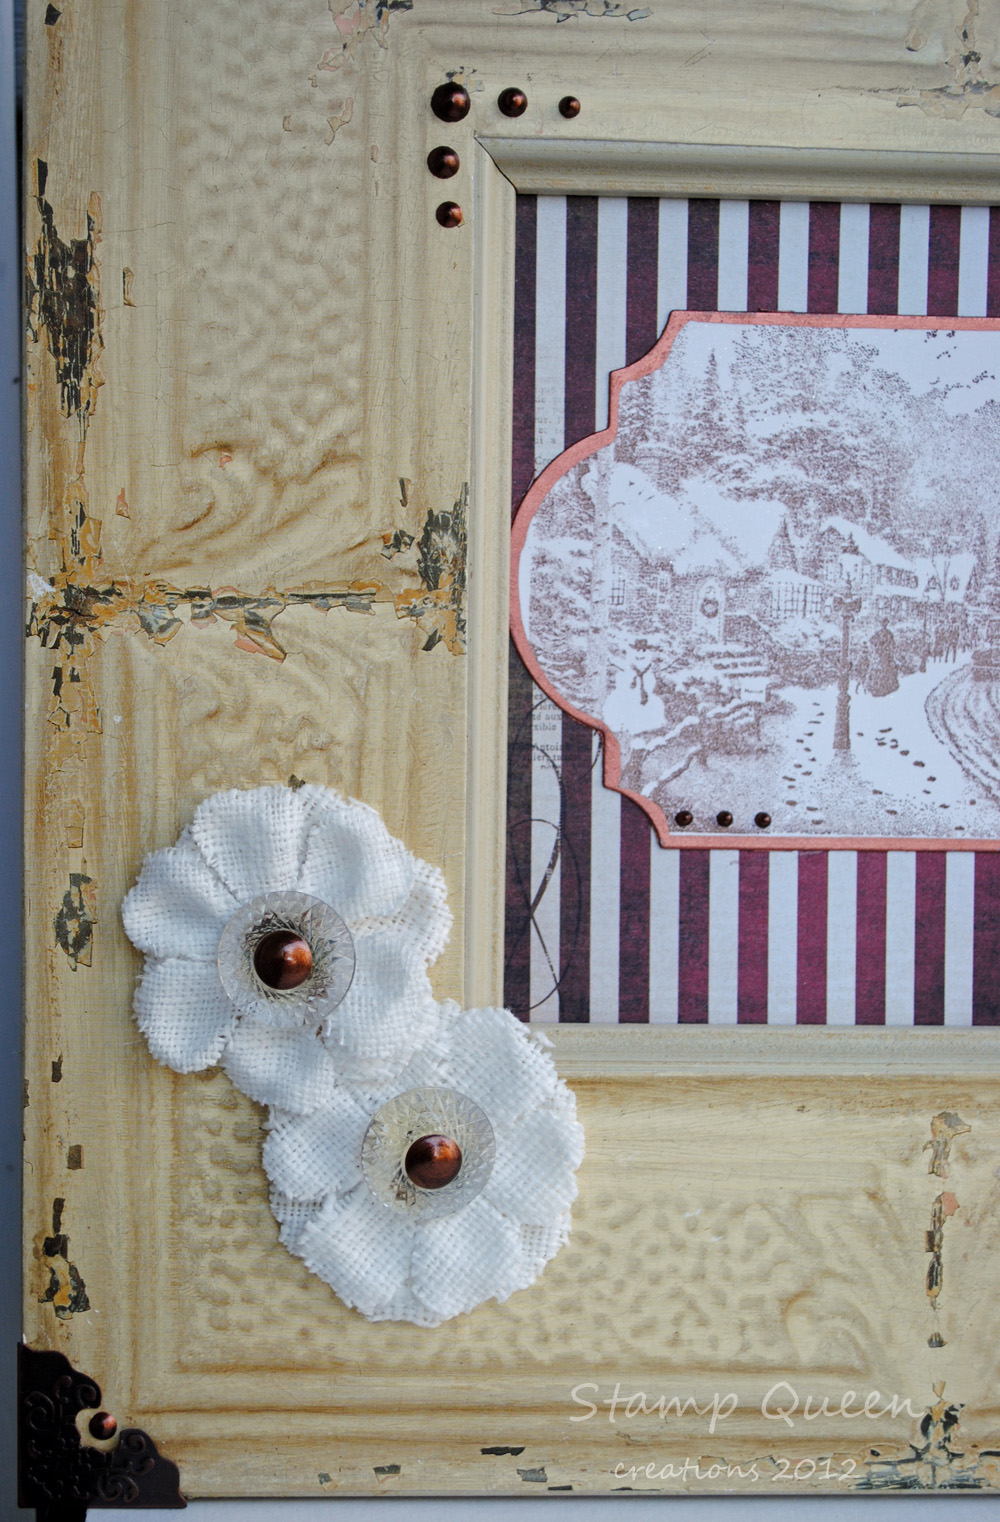
    I stamped the second panel with memento brown ink and colored with prismacolor pencils.
   I also used the gold metallic pen on the ridges of the bottle design as I thought they looked kinda like fancy glass windows.
  Alright I guess I had better get ready for work....
    Take Care
          Tera


Monday, November 26, 2012

Thank- you!!

Hallo,
  Well it was a nice weekend off and tonight its back to work....I had a few errands to run today including dropping off this card to my vet and his assistant. They were so kind when I lost my sweet old meow a couple weeks ago.
  This stamp is from Cornish Heritage Farms and I colored her to match my old meow - there is a bit more ornage on this one than my old one had in real life and this would also be her younger version as she had gotten very gray and white on the face in the last couple years.
   I cut the image out with a Spellbinders die and edged it with gold. I layered the main image to a scrap of DP (right side) and a scrap of old flocked wall paper (left).
   All for today - Take Care
                                                                                                                  Tera

Wednesday, November 21, 2012

Baby Girl gift box

Hallo,
  Well Its been a productive day so far - got the puppy out for our walk early and was to the grocery store by 8 am - in and out with 3/4 last minute turkey day items. I have 2 pumpkin pies baked, laundry done, conned DS into running the vacume while I did dishes and picked up a bit.
  I may get to the craft room for a bit but I am scheduled to work tonight so need to get a nap too....
  Todays project I did last month and haven't shown you yet. This is a box with a memory book inside and a card to match. All stamps on the box and memory book are from Flourishes. The background stamp on the card is from Impression Obsession.

  The lace on the front of the box is an old hand-made doilly that was frayed on 2 edges (garage sale find in a big box filled with old doillies) Well I cannot stand to throw away these pretties when someone hand-made them so I cut off the frayed parts and in this case sprayed it with pink glimmer mist and added it to the box .
  The stamps are colored with prismacolor pencils. The main image cut out with a Spellbinders die and the booties fussy cut byt hand.
  I used corners from Tim Holtz - colored with a gold metallic pen for the corners on the box and book, and I used a viva decor pen in gold on the card. I found several pretty ribbons and a button beaded trim that was very adorable to add to it too.
  I decporated the box with pink cardsrock and ribbon and the cover of the book too. The pages of the book are various pink DP pages.
   All for today - Will not post again until maybe friday as I work tonight and tomorrow night too, and then the Fam is doing our turkey friday afternoon (to let me get a bit of sleep!!)
  Have a great Thanksgiving eveeryone!!!
        Tera


Tuesday, November 20, 2012

Rejoice

Hallo,
  Well as busy day starting for me today but a quick stop in here for my latest project. I finished this last week and had not shared here yet, so I will use this for this weeks Tuesday challenge over at Flourishes. The challenge this time is to make something that makes you 'Happy'. Check out the challenge here - www.flourishes.org/blog/
  Well I really was happy the way this turned out and had alot of fun doing it.
   All the stamps are from Flourishes and the size is 16 by 20 inches.
   I will start with the center which is done on watercolor paper. I used several different watercolor srpays in shades of blue - glimmer mist and some from Zia . I then stamped the pointsettas in the corners with dark blue ink (more for positioning) I stamped the Bethleham and Wise Men scenes and embossed with white.
   For the frame - I stamped the pointsettas in black (again, more for positioning) and then stamped the phrases in gold - Rejoice in the top left corner and Wise men still seek him in the bottom right corner and colored the Rejoice in with a bit of copic marker.
  Then came the poitsettas - I stamped them all onto white cardstock and colored them in with colored pencils - about a dozen of them. Then I cut them out - most of them I used the whole image with the pines, about 6 of them just the pointsetta and then arranged them onto the picture and the frame.
   The last photo shows how I framed it - couldnot get good pictures with it in the frame.....
   All for today - off I go....
      Take Care
            Tera


Monday, November 19, 2012

Fall Truck

Hallo,
   Well it was a good mail day here at the Fujan house!!! My DD got a letter telling her of a scholarship she has earned from University of Nebraska - Lincoln which is nicely hefty!!!! Puts UNL at number one option after the Military Academy :)
DD has an interview with a local Senators selection committee for the Academy nomination next week - she has already had one with another Senators committee. And she also got her most recent ACT score today - the AF Academy recruiter told her of she could bump her score by even 1 point she would be in the top third for selection and she did just that!!!!
I am so proud of my girl - she has done all the paperwork for applications and scholarships herself, not to mention the work of grades, sports, ROTC, and extra-curricular activities!!!!!! YOU GO GIRL!!!!
    Ok - on to todays card - I made this for the current challenge over at the Impression Obsession blog which is for 'fall' - it was a it of a challenge for me as I am in full Christmas mode, so I had to back up a bit to fall :)
  I found the chipboard reindeer at Mike's and thought they would be great on Christmas cards but I think he looks pretty cool for fall too (now I wish I would have bought a couple more packets....)
  The main image is from Impression Obsession of course( Classic Truck - G1866) - colred with my prismacolor pencils. Check out the challenge here - www.mitrafriant.typepad.com - if you join in you could win free stamps!!!!
   The reindeer I inked with tea dye distress ink and then sprayed with bronze colored glimmer mist and then glued him to the card.
  All for today - Take Care
        Tera


Friday, November 16, 2012

Zebra Baby

Hallo,
  Not sure if I will get time to post later so a quick one now :) I have a long list of errands to get done and hope to squeeze in some craft time too.....
  I took my puppy for a short card ride and a long walk in the woods this am and she loved every minute and would have probably walked alot longer if I would have ahd time.
We walked for an hour. She is getting better in the car and I am hoping by taking her for walks in the woods via the car she will get to like the car ride better knowing she gets to explore in the woods.
  I did this card to match the baby box for my DH's niece that is having a baby in a couple weeks. The theme for her baby room is Zebra's and as you might have guessed, they are expecting a little girl.
  The stamp is from old Cornish Heritage Farms - haven't seen it up on the new store yet but I am sure it will be in time. I loved coloring the baby pink - made me smile.
  Well better get in gear ....
   Take Care
      Tera


Thursday, November 15, 2012

Christmas Village

Hallo,
  Just popping in a bit to show you another project made with the Thomas Kinkade stamp from Cornish Heritage Farms and the last of the cool tin tile look picture frames that I found at a thrift store (maybe I will get lucky and find some more sometime)
  I did this one in brighter reds and golds - the corners are Tim Holtz corners that I colored with a gold mettalic pen. I added gold viva decor pearl drops, gold sticker corners on the main image and a gold sparkly ribbon.
  I stamped the main image with a red/burgondy ink and matched up some cardstock and DP for behind it.
  Added some flowers that had a pinkish tone to them and a small section of beaded trim. The Merry Christmas embossed with red also.
  I really had fun with this one.
  All for now - need to get a bunch of my craft stuff put away - I had a craft fair at a local grade school today which was a total bust!! We hardly had anyone even come look and I sat there from 7 am till 230 pm and didn't sell a thing - and it was outside and damp, breezy and cold - I am still trying to thaw out.......ahhh well that it the way it goes sometimes....
   Dinner to get going and a ton of errands to do tomorrow so better finish up here....
   Take Care
       Tera


Wednesday, November 14, 2012

Storm Shadow

 Hallo,
   One more encaustic piece for you this am before I try to catch a bit of sleep (after walking Miss Kyna so she will let me sleep :).
   I may have another stamping post for you later today - I have a craft fair tomorrow to get ready for (pick out stuff to take and get it loaded into my van...) so we will see how much time I have.
  Again I took the first 3 pictures outside of the frame and the colors on this one are  true to real life on these first 3 - once I put it into the frame the photos all turned out waaayyy to orangey. It looks like the first 3 when its in the frame I just could not get it to photograph that way......
  This piece is slightly larger than 4 by 6 inches and I put it into a floating rame that measures 9 by 7 inches.
  And again this piece is up on the Etsy shop :) Have a look - I have alot of good stuff!!! :)
    Take Care
        Tera


Tuesday, November 13, 2012

Desert Silhouette

 Hallo,
   Another encaustic wax piece for you - or rather a combination of  8 smaller similar pieces.
   I had fun in my class this fall just experimenting with similar styles and colors and just modifying a little with each one - here are 2 different sets that I did that with but they match up well I think. One set is more gold and orange with the black silhouettes and the other more browns with gold and orange.
   It was really hard to get good pictures today due to the murky weather  -  first  I just layed the pieces on top of the frame - the top one with them all together is slightly more orange than real life
but the next 4 of individual pieces are just slightly paler than in real life but I think you will be able to 'see' how they look pretty well.
   The last 2 photos are taken with the pieces inside the frame so getting a good photo without glare was hard - combined with the fact that by this time it was raining outside and so I took them inside.
   I did all of these pieces with the wax and an iron - the lighter, more gold pieces I used a hot pen and wax to make the silhouettes and squiggleys.
   The frame size on this one is 23 inches wide at its widest and 11.5 inches tall - with each individual piece being 4 by 6 inches.
  Yup this one is up on the Etsy site too.....
    Take Care
   I am off to sleep - then I have 3 days off and a craft fair to do......
   Tera


Monday, November 12, 2012

Not just black and white....

 Hallo,
   Well my whole house slept late today (well sort of - the puppy didn't, but I went back to bed - for a bit - after letting puppy out ). The kids were off school and DH off work - I have to get to work tonight though....
   Showing you another of the encaustic pieces I did in my class this fall - this one was done on black paper and is a bit larger than most of the others - it measures 11.5 by 16 inches.
   This one was done with the iron and gold, red and orange wax.
   I put it into a 16 by 20 floating frame which looks cool. This first picture and the last one were taken outside with the piece not in the frame yet, just sitting on top and they show the truest colors. When I put it under the glass the colors tend to go more orangeish and red. But I think the frame makes it look really cool.
  I couldn't decide if I should put a small skinny border on the piece or not  - what I ended up doing was edging 2 sides - left and top with a gold metallic pen and that looks really cool!!!
   I ended up with some good deals on frames at A.C. Moore and Mike's this week - both had frames on sale for 40/50 % off and then had a coupon for 25 % off total sales (even sale items) so I was able to get a bunch of good frames for rather inexpensive. I really hate putting things on my Etsy shop and having to charge a big bunch mainly because of the frame!!!
  I had found some nice looking inexpensive frames at Wal-mart awhile back but they turned out to be very flimsy - and difficult to get the pictures into too - so I will be ditching those!!!
  Well time to try and get a nap - the weather has turned murky and rainy so that will help the nap along :) Hope it rains tomorrow too - I sleep so good when it rains during the day!!!
   Take Care
        Tera
P.S. This painting is up on the Etsy shop.....


Sunday, November 11, 2012

Vintage Village

Hallo,
  Happy Veteran's Day!!!
My DH served 23 years, his Dad was a Korean War Vet as well as several of his Uncles (WWII and Korea). My Dad was in the military for a few years and I have several cousins, nieces,nephews and friends that are currently serving in the military. THANK-YOU all!!!
  My project for today started with this cool picture frame I found at a thrift store - it looks like one of the old metal ceiling tiles.
  I decided to use it for the current challenge over at the CHF blog - www.cornishheritagefarms.blogspot.com
  The challenge this time was to use one of our Thomas Kinkade stamps. I love to color and LOVE my Kinkades but decided to not color this time. I stamped it with brown memento ink and cut the image out with a Spellbinders die and edged the panel with copper metallic ink.
  I added some metal corners in an aged copper color (Tim Holtz corners) and embossed the phrase in copper too. I also used a bronze viva decor pen for some accents on the inner corners, on the main image and for the 'pearls' in the center of the flower accents. The viva decor bronze is a real close match to the aged copper color of the metal corners.
  The DP behind the main image is a burgundy red with a slight copper glimmer to it - really pretty.
  I really had a good time with this one. I have another frame just like this one that I did Christmas style too but will show that another time :)
   All for tonight - I went to A.C. Moore today and JoAnn's yesterday and got some frames either on sale or with a coupon so now I need to put together some of the encaustic pieces that I did in class and get them ready to show you all (and for the Etsy shop - todays project will be up on my Etsy shop shortly  too :)
   Take Care
           Tera